Chocolate Guinness Cupcakes

Recipes

cupcake


I’m not a very confident baker so I surprised myself the other day when I made a batch of fantastically moist, not too sweet cupcakes. I think baking with booze might be my new forte!

I made these cupcakes for Boiler Magazine’s launch party on Friday because I wanted to incorporate beer into the event without worrying about a liquor license (because dudes like meat and beer right?).

These Irish-inspired treats are a home run crowd-pleaser. The Guinness and Baileys liqueur impart unexpected flavour and subtly enhance an everyday chocolate cupcake. The original recipe come from here, and creates a dozen cupcakes, I made mini cupcakes and the recipe yielded about 80 of them.

Chocolate Guinness Cupcakes with Baileys Buttercream Frosting

Ingredients

Cupcake Batter

1 cup Guinness
2 sticks unsalted butter
¾ cup unsweetened cocoa powder
2 cups all-purpose flour
2 cups sugar
1½ teaspoon baking soda
¾ teaspoon salt
2 large eggs
2/3 cup sour cream

Frosting

1 8 oz package of cream cheese (softened)
4 tablespoons of butter (softened)
4 cups powdered sugar
4-8 tablespoons of Baileys Irish Cream Liqueur

Directions 

1. Preheat the oven to 350° F. Line muffin tins with paper cupcake liners. Combine the stout and butter in a medium saucepan over medium heat until butter is melted. Add the cocoa powder and whisk until mixture is smooth. Remove from the heat and allow to cool slightly.

2. In a medium sized bowl, combine flour, sugar, baking soda and salt, and whisk together. In a large bowl, whisk together the eggs and sour cream until creamy. Add the stout-butter mixture to the eggs and sour cream, mix to combine. Slowly mix in the dry ingredients, whisking until incorporated.

3. Divide the batter evenly between the cupcake liners, filling them about ¾ full. Bake until a toothpick inserted in the centre comes out clean, about 17 minutes. Allow to cool in the pan for 5-10 minutes, then transfer to a wire rack to cool completely.

4. For the frosting: Combine cream cheese and butter in a large mixing bowl and beat until creamy. Gradually add the powdered sugar until well mixed. Add in the Bailey’s a tablespoon at a time until the texture is smooth, creamy, and spreadable. Frost the cool cupcakes as desired.


Boiler Magazine – Meet Your Makers

Handmade, Recipes, Winnipeg

BoilerMagazineCoverContributor EvaMe!

Contributor---Adriana-ResizeAdriana

Contributor---Trevin-ResizeTrevin

Contributor---Amy-Jean-ResizeAmy Jean

Contributor-JordanJordan


So, that little magazine project I posted about a few months ago is coming to an end and we’re going out with a bang! In case you’ve forgotten Boiler Magazine is Winnipeg’s first men’s food magazine. Our first issue covers a range of topics from junk food cravings to making moonshine, with a whole lot of feel-good food in between.

Boiler Magazine is holding a launch party on Friday April 4 from 12 – 4 pm at The Roblin Centre (Red River College’s Exchange District campus). We have awesome prizes to give away, an eating contest for some brave bellies, and a ton of delicious free food that you can help us eat!

Our magazine is one of 14 student created magazines being featured at the Creative Communications Magazine Trade Fair (check the Facebook page for more info). There’s a lot of interesting topics being explored if you’re not into guiltlessly celebrating indulgent, delicious food— but stop by our booth and say “Hi” anyways!

I thought I would put some friendly faces to Boiler Magazine’s creative team, and share with you the people I’ve spent more time with in the last 3 months than my own family:

Photo Editor – Eva Wasney (Me)
Copy Editor – Adriana Mingo
Copy Editor – Trevin Thomas
Editor-in-chief – Amy Jean MacLean
Layout Editor – Jordan Welwood

So come by on Friday and see what some very creative people have been working their tails off for, or to eat a bunch of free food. Stay hungry Winnipeg, lunch is on us.


Spice Rub and Shameless Self-Promotion

Photos, Recipes

Spicerub3 SpiceRub SpiceRub2Let’s start with the spices and I’ll get to the promotional details later.

I know it’s almost February and none of you are interested in talking about the holidays but I still haven’t shared all of the Christmas presents I made this year! That said, this recipe isn’t festive at all, unless you gave this spice rub as a Valentines Day present and attached a card that says something adorable like “You spice up my life baby!”

Or not, whatever.

What’s more important: this recipe is so damn easy and yields so much that you’ll probably be running around finding reasons to give spice rub to everyone you know! But you could just hoard it for yourself and make lots and lots of pulled pork.

If you’re like me and don’t have a well-stocked spice rack the upfront cost of all the spices might be a bit alarming. But if you don’t have to buy new spices for every recipe you make then you probably have most of these ingredients at home.

I found the recipe here, but instead of making the 14-spice version I made a 13-spice version because I couldn’t find mace (turns out is not pepper spray), which is totally fine according to the original recipe.

The end result is a smokey blend with a bit of lingering heat that can be used for any kind of meat.

Dry Spice Rub

Ingredients

1/2 cup dark brown sugar
1/4 cup seasoned salt (reduce to 1/8 cup for low-sodium version)
1/4 cup paprika
1/4 cup smoked paprika
1 tablespoon garlic powder
2 teaspoons onion powder
1 tablespoon celery salt
2 tablespoons chili powder
2 tablespoons black pepper
1 tablespoon rubbed dried sage
1 teaspoon ground allspice
1 teaspoon ground cumin
1/4 teaspoon cayenne
1/4 teaspoon ground mace
1/8 teaspoon ground cloves

Directions

1. Combine all ingredients in a food processor and blend until uniform. You can sift the ingredients to make the mixture smoother. Keep unrefrigerated in an air-tight container.

Now for the shameless promotion!

IMG_6155

If you follow me on any social media platform then you’ve probably noticed a post or two about Boiler Magazine.To give everyone a bit more background:

Boiler Magazine is a student-created publication that empowers its readers to enjoy food that tastes amazing without a second thought about guilt or gluttony. The project is the creative work of myself and four other creative geniuses (aka. classmates), Jordan Welwood, Amy Jean MacLean, Trevin Thomas and Adriana Mingo. Together we are writing original stories, making our own ads, becoming layout and design pros, marketing the hell out of our yet to be product and social-mediaing like no tomorrow.

We decided to make a magazine for men because there is a lack of content out there for the male dinner host, the Super Bowl wing aficionado, or the boyfriend who likes to make signature cocktails. But ladies this isn’t meant to alienate you! Speaking as a woman, the content of Boiler Magazine is going to be interesting, engaging and totally drool-worthy.

I’m excited and I hope you are too! Our launch date is April 4th, 2014 and you can follow us on Twitter, Instagram and Facebook if you aren’t already!

ps. The reason I lumped these two subjects together is because I’ve found out through all of my research that guys like meat – like a lot – so the spice rub was just a ploy to hook all you dudes out there (nooootttttt it’s just really good, go make it)!

Pancake Celebration

Photos, Recipes, Winnipeg

Pancakes  It’s official, yesterday I handed in my academic plan – after too much deliberation– and I’ve decided to major in journalism! It seems to be the path less travelled these days thanks to a somewhat bleak future for the printed news. But even in the age of the internet there’s still a need for well written, insightful articles and I would’t mind contributing to that.

Aside from being a respectable, if not insanely stressful, career path, I knew when I started Creative Communications that I wanted to be a journalist. I really like storytelling, and once I got over my trepidations with interviewing people I fell in love with the whole process.

Even though I knew all of this, I was experiencing a huge amount of anxiety leading up to my declaration. I’ve never been good at decisions – choosing a restaurant to eat at or a movie to see can be a painful affair for anyone accompanying me – so deciding what I wanted to do for the rest of my life gave me horrible stress nightmares.

So I took a step back and imagined how I would feel 20 years down the road if I hadn’t done journalism. I would feel pretty guilty. So even if I don’t end up working as a reporter or a news anchor in the future I’m feeling pretty satisfied with my decision and I’m celebrating with a pile of homemade banana pancakes!

I adapted the recipe from here, which makes too many pancakes for one person so I tossed the rest of the mixture in a sandwich bag and put it in the freezer. This way when I’m ready to make pancakes again I can just defrost the bag, snip off one corner of the bag and pipe the batter straight into a skillet, easy peasy.

Fluffy Homemade Pancakes

Ingredients

1 1/2 cups (195 grams) all-purpose flour (we use Gold Medal all-purpose flour)
2 tablespoons sugar
1 tablespoon baking powder
3/4 teaspoon kosher salt
1 1/4 cups (295 ml) milk, whole or 2% reduced fat milk are best
1 egg
4 tablespoons butter, melted, plus more for skillet
1 teaspoon vanilla extract
3 tablespoons ground flax seeds

Directions

1. Sift all of the dry ingredients together in a medium bowl. Melt the butter and combine it with the wet ingredients in a separate bowl. Make a well in the flour and pour the wet mixture into it.  Stir until there are no more large pockets of flour, but it’s ok if the batter is a little lumpy.

2. Heat a large skillet with coconut oil over medium heat. Pour the pancake batter into the skillet using a ladle or, if you want to be more accurate, a 1/4 cup measuring cup. Flip the pancakes when the bubbles stop popping around the edge of the batter.

3. Serve immediately with syrup or jam and your choice of fruit as a topping.

Homemade Baileys Irish Cream

Cocktails, Recipes

Baileys3Baileys1Baileys2For the last two Christmases I’ve focused on giving handmade gifts instead of spending endless hours and countless dollars at a shopping mall. Because of this, gift giving was way more fun than gift-receiving this year – although maybe that’s because I’m finally becoming a mature adult (yeah right).

I was inspired to try making Baileys Irish Cream when a friend of mine recently made her own Paleo version for a party. As delicious as that version was I found a recipe from here that was a little more traditional, ie. something I thought my Mom might enjoy. The flavour is spot on and this recipe makes about a litre of Baileys, which is a steal considering how expensive it is at the Liquor Mart.

You can use a blender, food processor, or a whisk and a really strong arm to mix the ingredients together. You can keep the Baileys in the fridge for up to two months, but who are we kidding this tasty treat will be gone before the next snow storm.

Homemade Baileys Irish Cream

Ingredients

1 2/3 cups Jameson Irish Whiskey
1 cup half & half or heavy cream
1 3/4 cup sweetened condensed milk
2 tbsp chocolate syrup (I used hot chocolate powder instead)
2 tsp vanilla extract
1 tsp instant coffee

Directions

1. Combine all ingredients in a blender or food processor for 30 seconds. Store in an airtight container in the fridge and enjoy over ice, in coffee or mixed with milk!

Spiked Apple Cider

Cocktails, Recipes

Cider1 Cider2

Since you’ve finished all your holiday shopping, wrapping and decorating, I think it’s time for a drink. Oh wait, you haven’t started yet? Me neither! I think that calls for a drink. This recipe requires more prep than the average cocktail, but you’ll have a big pot of apple cider that will last until the new year. And if you’re hating Winnipeg’s -40 weather this will definitely warm you up. This recipe is really simple and easily reheated after the fact. I found recipes here and here and altered them a little based on what I had in my cupboards. I added a little too much sugar in the first batch because I didn’t account for all of the natural sugar in the apples. I ended up cutting the cider with some water to make it less syrupy, which worked like a charm.

Spiked Apple Cider

Ingredients
10-12 gala apples (or whatever sweet apple you prefer)
4 cinnamon sticks
4 tbs allspice
2 tbs cloves
1/2 cup sugar (optional)
Spiced whiskey or rum
Cheesecloth

Directions
1. Quarter the apples, you don’t have to worry about the seeds and stems unless you want some spicy apple sauce at the end (not a terrible idea).

2. In a big stockpot, add apples and sugar and fill with enough water to cover the apples.

3. Tie all of the spices in a doubled-up piece of cheesecloth and add it to the pot.

4. Bring to a rolling boil and leave, uncovered, on high for 1 hour. Turn down the heat and simmer, covered, for 2 more hours.

5. Take off heat and let the liquid cool before thoroughly smushing (accurate, but made up word) everything with a potato masher. Using a spoon, push the mixture through a sieve to strain out the stems and pulp.

6. Reheat the cider on the stove or in the microwave. Add 1 1/2 ounces of whisky or rum to a mug and top with hot apple cider. Garnish with an orange peel.

Happy Sipping!

Parsnip Soup

Photos, Recipes, Vegetarian

PARSNIPS1
Parsnips2

I’m an anomaly among Winnipeggers – I love winter. And now that it’s started snowing (regardless how superficially) my little icy heart has started jumping for joy!

Every year around this time I begin giddily preparing for the cold months ahead. First, I do a major clean sweep – my allergies don’t like hibernating with dust bunnies. Second, my urge to knit is reinvigorated and I continue working on the scarf I started two years ago. And third, I make soup, pot upon pot of warm, hearty soup.

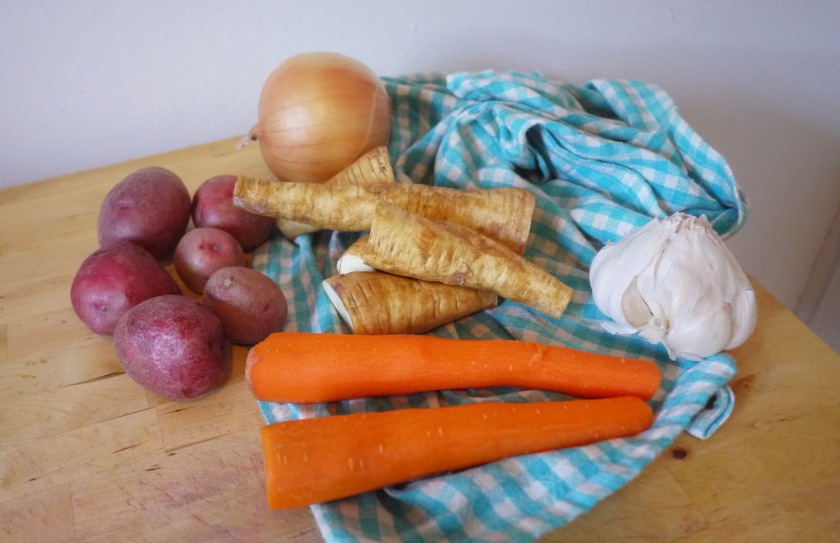
This soup recipe is the first of the season, and one of the first times I’ve made a pureed soup (only because I previously lacked a blender). I’ve never really known what to do with parsnips, other than mash them and soup them, so I decided on the latter.

I got the recipe from here and I was surprised how simple and delicious it was. I decided to add a little ginger to make things interesting and I garnished it with pumpkin seeds and hot sauce – that combo with clear you up and warm you up at the same time!

Parsnip & Potato Soup

Ingredients

  • 2 tbs Butter
  • 1 tbs Olive Oil
  • 2 whole Parsnips, 2 should be about 1.5 lbs, peeled and chopped
  • 2 whole Potatoes, peeled and chopped
  • 2 whole Carrots, cleaned and chopped
  • 1 whole Yellow Onion, chopped
  • 2 cloves Garlic, minced
  • 2 tbs chopped Fresh Basil, or 1 tbs Dried Basil
  • 1 whole Bay Leaf
  • 3-½ cups Vegetable Broth, or enough to cover the vegetables
  • 1 tsp Fresh Ginger, minced
  • ½ cups Heavy Cream or Milk
  • Salt to taste
  • Freshly ground Black Pepper, to taste

Directions

  1. Melt the butter in a large heavy pot over medium heat then pour in the olive oil. Add the chopped parsnips, potatoes, carrots, onions, garlic, basil, and bay leaf. Cook for 10 minutes, stirring occasionally. Stir in the vegetable broth.
  2. Bring to a boil, cover, and simmer over medium-low heat for 20 minutes, or until vegetables are tender. Discard bay leaf.
  3. Remove from heat and use an immersion blender to blend the soup until creamy. If you don’t have an immersion blender, you can use a blender and blend until smooth. If you do use a standard blender, this should be done in several batches. Make sure to leave space in the blender and crack the top opening, to allow some steam to escape as you blend.
  4. Return soup to pot and add heavy cream or milk; stir to combine. Add salt and pepper to taste. Serve warm.

Canning Salsa

Recipes, Vegetarian

Tomatoes Blackened Simmering cans Jars


A week ago I had too many tomatoes, and now I have a years worth of salsa! Last week I had dinner with my parents, who sent me home with a giant bundle of tomatoes from my aunt’s garden. I had already been planning on canning something this fall so this plethora of t’maters was the perfect excuse.

I should let you know that this was my first attempt at canning. And after reading stacks of articles about proper canning techniques I was very careful to follow all the directions I found, as closely as I could. I bought canning tongs and new cans but didn’t purchase a canning rack for processing the cans. Instead I placed a dishtowel underneath the jars to prevent them from getting too hot while they were boiling. Not all of my cans sealed properly (I found some simple tests for seals here), so I reprocessed them the next day for another 15 minutes.

This recipe is fairly mild but really flavourful, and the process is pretty quick once you have your workspace prepped. I didn’t have any anaheim peppers as the recipe called for so I substituted yellow bell peppers and broiled their skins off in the oven.

Canned Tomato Salsa

I used this recipe

Ingredients

5 lbs tomatoes (about 10 cups)
1 lb peppers (about 2 cups)
3 Jalapeño chilies, seeded & stems removed (or keep seeds for lots o’ spice)
1 1/2 cups chopped onion
3 cloves minced garlic
1 cup apple cider vinegar
1/2 cup loosely packed fresh cilantro
2 tsp dried oregano
1/2 tsp ground cumin
2 tsp salt
1-2 tsp sugar or more (depending on taste)

Canning Equipment Needed

5-6 pint sized canning jars (I used 12 1/2 pint jars), with rings and new lids
1 very large stockpot (not aluminum because acidity will corrode pot)
1 steamer rack (or dish towel like I described above)
Canning tongs to lift jars out of hot water

Instructions

1. Place jars in canning pot and fill with water until the lip of the jars are covered. Bring water to a simmer for 10 minutes, and keep jars in the warm water until you’re ready to fill them. Have a kettle filled with water ready to boil so you can sterilize the lids right before canning.

2. If you have a gas range you can roast your peppers over the flame, but if not you can broil the peppers in the oven until their skin is black. Once they have cooled gently rub off the outer skin and discard.

3. Prepare the tomatoes. You can do this on a grill or you can broil the tomatoes as well by halving them and placing them skin-side up on a baking sheet. You can also blanch them to remove the skins but this is the least flavourful way of getting the skins off. To blanch anything means to place it in boiling water for a short amount of time and then moving them to an ice bath, the skins will come off easily.

4. Put all of the ingredients into a large stainless steel pot. Bring to a boil and then simmer, uncovered for about 10 minutes.

5. While salsa is cooking, place the jar lids in a bowl of boiled water and cover to sterilize them.

6. Adjust seasonings. If too acidic add more sugar, if too sweet add more vinegar. You can also use an immersion blender if you prefer your salsa smooth instead of chunky.

7. Ladle salsa into jars, leaving about 1/2 inch of room on the top. Wipe the mouths with a clean paper towel to get rid of any salsa bits. Place the lids on and screw on the rings but make sure you don’t over-tighten since air needs to escape during the next step.

8. Place the jars back into the large pot that was keeping them warm. Cover the jars with at least 1 inch of water and bring to a boil. Process for 15 minutes and turn off the heat, let the jars sit in the water for another 5 minutes. Remove the jars using the canning tongs and let them sit on the counter until completely cool. You should hear lots of popping sounds as the jars create vacuum seals. Check your cans before storing them in a cool dry place, if any aren’t sealed properly you can reprocess them. Canned salsa should be eaten within a year so remember to write dates on your jars somewhere.